
What a Bad Defrost Board Looks Like: A Visual Guide to Identifying Failure
What a Bad Defrost Board Looks Like: A Visual Guide to Identifying Failure
Is your heat pump covered in ice during winter? Does it struggle to keep your home warm even when running constantly? The culprit might be a bad defrost board. Identifying a faulty defrost control board early can save you hundreds of dollars in repair costs and prevent complete system failure.
In this guide, you'll learn exactly what a bad defrost board looks like, the visual signs of failure, and how to tell if you need professional HVAC repair.
What Is a Defrost Board and Why Does It Matter?
A defrost control board is the brain behind your heat pump's defrost cycle. During cold weather, moisture in the air freezes on your outdoor coil. This ice buildup prevents heat transfer and reduces efficiency dramatically.
The defrost board monitors your system and initiates a defrost cycle when needed. It reverses the refrigerant flow temporarily, sending hot gas to the outdoor coil to melt accumulated ice. Without a working defrost board, your heat pump will freeze solid and stop heating your home.
Understanding how to spot a bad defrost board helps you catch problems before they escalate into expensive emergency repairs.
Visual Signs of a Bad Defrost Board
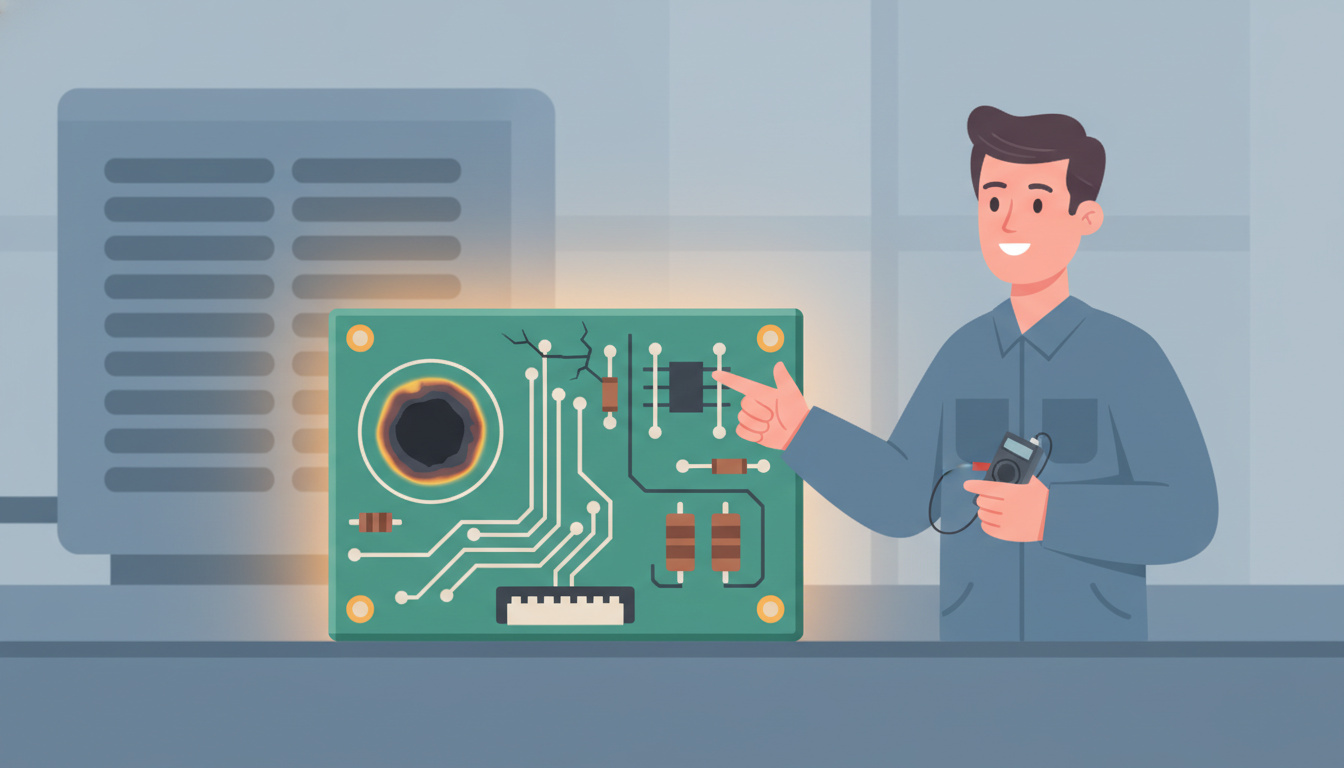
Burned or Scorched Components
The most obvious sign of a bad defrost board is visible burn damage. Look for:
- Black scorch marks around relays or connections
- Melted plastic on the board housing
- Discolored resistors that appear brown or black instead of their normal color
- Burned solder joints that look bubbled or cracked
Heat damage occurs when relays stick, capacitors fail, or voltage spikes damage the circuit. If you see any scorching, the board needs immediate replacement.
Corroded or Oxidized Connections
Moisture is a defrost board's worst enemy. Check for:
- Green or white corrosion on terminal connections
- Rust around mounting screws
- Oxidized wire terminals that appear dull or crusty
- Water stains on the circuit board itself
Corrosion creates resistance in electrical connections. This causes intermittent operation, where the defrost cycle works sometimes but not others. Even minor corrosion can lead to complete failure.
Failed Capacitors or Relays
Look closely at the components mounted on the board:
- Bulging capacitors - they should be flat on top, not rounded or swollen
- Relays that won't click when manually pressed
- Loose or rattling components when you gently shake the board
- Leaking capacitor fluid (appears as dark residue)
Capacitors and relays have a finite lifespan. After 10-15 years of cycling thousands of times, mechanical wear causes failure.
Malfunctioning LED Indicators
Most modern defrost boards have LED lights that indicate status:
- No lights at all when power is applied means board failure
- Rapidly flashing LEDs often indicate an error code
- Stuck on continuously without cycling suggests a frozen relay
- Wrong color display (if your board uses multi-color LEDs)
Check your manufacturer's documentation to decode specific LED patterns. Many boards use flash sequences to communicate fault codes.
Physical Symptoms on Your Heat Pump
Excessive Ice Buildup on Outdoor Unit
When your defrost board fails, ice accumulates unchecked:
- Ice covering the entire outdoor coil more than 1/4 inch thick
- Ice formation during normal defrost periods (boards typically defrost every 30-90 minutes)
- Solid ice block encasing the unit
- Ice extending to the ground around the base
A normal heat pump defrost cycle melts ice before it becomes excessive. If you see heavy ice buildup, the defrost board isn't initiating cycles properly.
Outdoor Fan Running During Defrost
During a proper defrost cycle, the outdoor fan should stop. If you observe:
- Fan continuing to run while the unit is steaming (indicating defrost mode)
- No fan shutdown during the heating cycle
- Constant fan operation regardless of temperature
This indicates the defrost board isn't controlling the fan relay correctly. The fan blows cold air across the coil during defrost, preventing ice from melting.
Reversing Valve Not Switching
The defrost cycle temporarily switches your heat pump into cooling mode. Signs of reversing valve control failure:
- No temperature change in the outdoor unit during defrost
- Indoor air stays cold when defrost should activate auxiliary heat
- No hissing sound from the reversing valve during defrost initiation
A bad defrost board may fail to energize the reversing valve solenoid. This prevents the refrigerant reversal needed to melt ice.
Testing Your Defrost Board
Visual Inspection Steps
Before calling a technician, you can perform a basic inspection:
- Turn off power at the breaker box completely
- Remove the access panel on your outdoor unit
- Locate the defrost board (usually mounted in the control box)
- Look for visible damage using a flashlight
- Check wire connections for looseness or corrosion
- Photograph any damage for reference
Never touch electrical components with power on. Even if you're comfortable with DIY work, electrical safety requires complete power shutdown.
The Test Button Method
Many defrost boards include a test button:
- Press and hold the test button for 3-5 seconds
- Watch for the defrost cycle to initiate (reversing valve clicks, outdoor fan stops)
- Listen for the relay clicking inside the board
- Observe LED indicators for error codes
If pressing the test button doesn't initiate defrost, or if you hear clicking but nothing happens, the board has likely failed.
When to Call a Professional
Some defrost board issues require professional diagnosis:
- Intermittent failures that only occur in specific conditions
- Sensor-related problems requiring temperature measurements
- Voltage testing with a multimeter
- Replacement requiring refrigerant handling
For reliable heat pump repair, contact a licensed HVAC technician if you're uncomfortable working with electrical components.
Common Causes of Defrost Board Failure
Age and Wear
Like all electronics, defrost boards deteriorate over time:
- Average lifespan: 10-15 years
- Relay cycle limits: 50,000-100,000 cycles before mechanical failure
- Capacitor degradation: electrolyte dries out after years of heat exposure
- Solder joint fatigue: expansion and contraction cause cracks
If your heat pump is over 10 years old and shows defrost board symptoms, age-related failure is likely.
Power Surges and Lightning Strikes
Electrical events can instantly destroy control boards:
- Lightning nearby induces voltage spikes through power lines
- Utility power surges when service is restored after outages
- Generator backfeeding without proper transfer switch installation
- Faulty wiring causing voltage fluctuations
Whole-home surge protection can prevent expensive board replacements.
Moisture Intrusion
Water and electronics don't mix:
- Condensation from temperature cycling
- Rain or snow entering through damaged housing
- Refrigerant leaks dripping on the control board
- Poor sealing of the control box
Check that your control box cover seals properly and drain holes aren't clogged.
Manufacturing Defects
Some boards fail prematurely due to quality issues:
- Cold solder joints that crack during shipment or installation
- Defective relays with manufacturing flaws
- Poor quality capacitors that fail within 5 years
- Design flaws in specific model years
Research your specific heat pump model online. Some manufacturers issued recalls or technical bulletins for problematic defrost boards.
Defrost Board Replacement Cost
Understanding the costs helps you budget for repairs:
Parts Cost
- Universal defrost boards: $75-$150
- OEM manufacturer boards: $150-$300
- Premium boards with upgraded features: $250-$400
Generic boards work with many systems but may lack brand-specific features. OEM parts ensure perfect compatibility.
Labor Cost
Professional installation typically runs:
- Simple replacement: 1-2 hours at $80-$150 per hour
- Complex replacement with sensor work: 2-3 hours
- Emergency service: add $100-$200 for after-hours calls
Total repair cost averages $250-$600 depending on your location and system complexity.
DIY Replacement Considerations
If you have electrical experience:
- Difficulty level: Moderate (requires basic electrical skills)
- Tools needed: Screwdrivers, wire strippers, multimeter
- Time required: 1-2 hours for confident DIYers
- Risk: Incorrect wiring can damage expensive components
Save 50-70% on labor by replacing the board yourself, but only if you're comfortable working with 240V electrical systems.
Preventing Defrost Board Failure
Regular Maintenance
Extend your defrost board's life with:
- Annual professional inspections during spring tune-ups
- Keep the control box clean and free from debris
- Check for corrosion on connections twice per year
- Ensure proper drainage from the control box
- Trim vegetation away from the outdoor unit
Preventative maintenance catches small issues before they become expensive failures.
Surge Protection
Protect your investment:
- Install whole-home surge protector at your electrical panel ($200-$400)
- Use point-of-use surge protectors for HVAC systems ($50-$100)
- Have a licensed electrician verify proper grounding
- Consider UPS backup for sensitive control boards
Surge protection pays for itself after preventing just one control board failure.
Environmental Considerations
Reduce stress on your defrost board:
- Ensure adequate airflow around the outdoor unit
- Keep the unit level to prevent water pooling in the control box
- Seal the control box properly against weather
- Consider a protective cover for extreme climates (ensure it doesn't restrict airflow)
Environmental protection significantly extends component lifespan.
Frequently Asked Questions
Can a bad defrost board cause high electric bills?
Yes. When your defrost board fails, ice buildup on the outdoor coil forces your system to work harder. The compressor runs longer to produce the same heat. Additionally, auxiliary electric heat runs more frequently to compensate, dramatically increasing energy consumption. Some homeowners report 30-50% higher bills during winter months with a failed defrost board.
How do I know if it's the defrost board or the defrost sensor?
The defrost sensor is a separate component (usually a thermostat attached to the outdoor coil) that signals the board when ice is present. If your board initiates defrost cycles during the test function but not during normal operation, the sensor is likely bad. If the test function doesn't work either, the board itself has failed. A multimeter can test sensor continuity, but replacement is often easier than troubleshooting.
Will my heat pump work without a defrost board?
Your heat pump will run, but it can't defrost automatically. In mild climates (above 40°F), you might not notice problems. Below freezing, ice will accumulate until the system stops producing heat entirely. Running without a functional defrost board causes compressor strain and potential damage from liquid refrigerant returning to the compressor. Replace the board promptly to avoid secondary damage.
Are all defrost boards universal?
No. While "universal" boards exist that work with many systems, defrost boards vary by voltage (24V vs 240V), relay configuration, sensor type (temperature vs pressure), and timing settings. Using an incorrect board can cause improper defrost cycles or no defrost at all. Always verify compatibility with your specific heat pump model before purchasing a replacement.
Can I clean a corroded defrost board instead of replacing it?
Light surface corrosion on terminals can be cleaned with electrical contact cleaner and a small wire brush. However, corrosion on the circuit board itself or inside components indicates moisture intrusion that likely damaged internal circuitry. Cleaning may provide temporary improvement, but the board will fail again soon. If you see significant corrosion, replacement is the reliable long-term solution.
Conclusion: Protect Your Comfort and Investment
Recognizing what a bad defrost board looks like empowers you to catch problems early. Look for visual signs like burned components, corrosion, failed capacitors, and malfunctioning LEDs. Watch for physical symptoms like excessive ice buildup and improper defrost cycling.
When you spot these warning signs, act quickly. A $300 board replacement is far cheaper than a $3,000 compressor failure caused by liquid slugging from ice-clogged coils.
For minor issues, confident DIYers can replace defrost boards safely with proper precautions. For complex problems or if you're unsure, professional diagnosis ensures accurate repairs and system safety.
Don't let a bad defrost board leave you in the cold. Regular inspections, surge protection, and prompt attention to warning signs keep your heat pump running efficiently for years to come.
Ready to fix your heat pump issues? Contact a qualified HVAC technician today for expert diagnosis and repair.